Missed the Back to School Workshop? Watch the Recordings Here

LMS Integration Setup

Here you will find instructions for setting up the integration between your LMS and Voces Digital. Integration is done with the help of a platform called Edlink, so you will see them mentioned in the following documentation. If you have any questions during the integration process, please email [email protected] for support.

These instructions are intended for a school's LMS administrator. If you are a teacher and your admin has already completed the steps, please click here for further instructions.

When you connect your district LMS, you can expect the following functionality:

  • Students, teachers, and administrators will be able to sign into Voces with their LMS account.
  • Voces can sync course roster information from the LMS.
  • Voces can create and update coursework within the LMS courses.
  • Voces can sync grades directly into the LMS.

1. The Integration Process

Voces integration link: https://ed.link/integrate/864a3431-88a6-428f-a32d-62943c14d521

Once you open the integration link, you will see the integration overview screen. This screen is purely informational and contains details about the application, vendor, accepted data sources, and capabilities of the integration. When you're ready, click Continue With Integration.

2. Creating an Account

The first step in the integration process is to create an administrator account. This account is used to connect and manage connections to your learning management system, G Suite, Microsoft Office 365, etc. Teachers and students will not have to create accounts. This process is for administrators only. If you already have an account, you can sign in and continue to the next step.

If you have not already created an account, you will also be prompted to create a new organization for your school or district. Enter the name of your organization and select a short nickname. Please note that nicknames must be at least 3 characters long and must be unique. If you accidentally select a nickname that has already been used, you will receive a warning.

3. Connecting a Source

Select the desired source from the dropdown menu and complete the required fields. Edlink connects with a variety of different systems. Each system will vary slightly in the connection process. The steps for each supported LMS can be found further down this page.

4. Reviewing the Requested Permissions

Once your source is connected, you should carefully review the requested permissions. The vendor's required permissions cannot be modified by school administrators at this time. When you have reviewed the permissions, you may click Create Integration to proceed.

5. You're All Done

That's it - if your integration was successful, you should see a brief confirmation screen. Please note, after your integration has been created, there may be a brief delay before teachers and students can sign into Voces.

Once everything is synced up properly, users can begin to sign into Voces and enjoy the smooth data sync that Edlink enables! If your teachers need assistance setting up their accounts please refer them to our LMS setup videos or have them email [email protected] for support.

Canvas Integration

Create Canvas Developer Keys

Edlink connects through the Canvas API to provide seamless experiences for teacher and students. In order to do so, you need to generate developer keys. Here are the steps required to create developer keys:

  1. Log into your school or university Canvas account.
  2. Navigate to your Admin tab for the top-level site by clicking the Admin tab and then the name of your organization.
  3. Click the Developer Keys menu item towards the bottom left-hand side.
  4. Create a new developer key by clicking the + Developer Key button and then select the + API Key option from the dropdown.
  5. Fill out the form with the following details (all other fields should remain blank):
    Key Name:
    Owner Email:
    Redirect URIs:
    Icon URL:
  6. Click the blue Save button in the bottom right-hand side of the screen.
  7. Toggle the State switch to "ON" next to the developer key that you just created.

Connect G Suite to Edlink

You're all done and ready to move on to the final step.


Complete the Integration

When you get to the Sources page, select "Canvas" from the dropdown. You will see the following form:
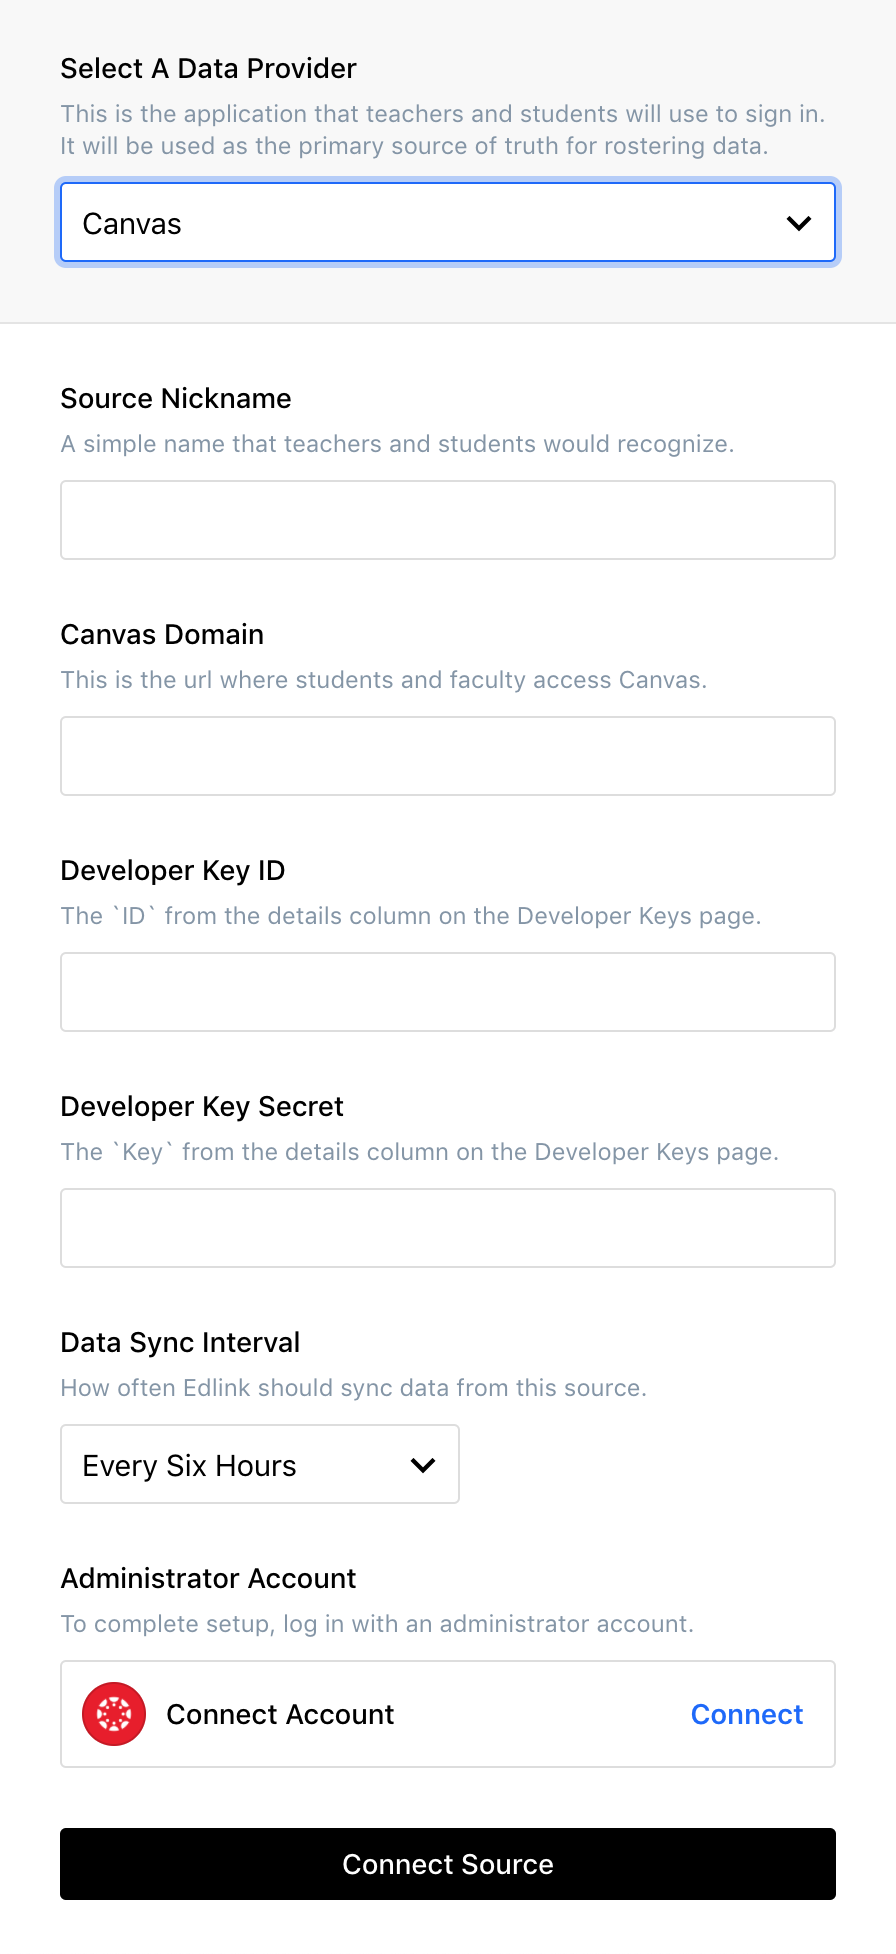
Connect Canvas to Edlink
  1. Source Nickname - Create a nickname that your students and teachers will recognize. This name can be something like "Canvas" or "My School's Canvas". It does not have to be anything in particular, but it should be familiar to your users.
  2. Canvas Domain The domain that you visit when you want to access Canvas. Typically, this will be something like https://myschool.instructure.com or https://canvas.myschool.edu.
  3. Developer Key ID - Copy and paste the Developer Key that we created during the step above.
  4. Developer Key Secret - Copy and paste the Developer Key Secret that we created during the step above. You can find it by clicking the "Show Key" button, below the other key. Please be careful that you copy the entire secret. Any missing characters will result in an inability for Edlink to connect. It is extremely important that you do not share this secret key with anyone else.
  5. Administrator Account - This is the final step and ensures that you have completed everything else successfully.
    1. Click the Connect button on the right side of the box.
    2. Log into your Canvas account. You may already be logged in, in which case, skip to the next step.
    3. Canvas will prompt you to authorize Edlink. Click the blue "Authorize" button.
    4. Upon authorization, Canvas will send you back to Edlink and the box will change to say "Account Connected". Canvas Account Connected

If you are having trouble connecting, there is probably an error with your Canvas configuration. Most likely, you either incorrectly entered your school's Canvas domain, or improperly copied over the Developer Key / Secret. If you are still having trouble, don't hesitate to contact us at [email protected] for more assistance.

You are now finished and can click the black "Connect Source" button at the bottom of the screen.
Schoology Integration

When you get to the Sources page, select "Schoology" from the dropdown. You will see the following form:

  1. Source Nickname - Create a nickname that your students and teachers will recognize. This name can be something like "Schoology" or "My School's Schoology". It does not have to be anything in particular, but it should be familiar to your users.
  2. Schoology Domain The domain that you visit when you want to access Schoology. Typically, this will be something like https://myschool.schoology.com or https://schoology.myschool.edu.
  3. Administrator Account - This is the final step and ensures that you have completed everything else successfully.
    1. Click the Connect button on the right side of the box.
    2. Log into your Schoology account. You may already be logged in, in which case, skip to the next step.
    3. Schoology will prompt you to authorize Edlink. Click the authorize button if you are prompted.
    4. Upon authorization, Schoology will send you back to Edlink and the box will change to say "Account Connected".

If you are having trouble connecting, there is probably an error with your Schoology configuration. Most likely, you either incorrectly entered your school's Schoology domain, or improperly added Edlink as a REST API provider in Schoology. If you are still having trouble, don't hesitate to contact us at [email protected] for more assistance.

You are now finished and can click the black "Connect Source" button at the bottom of the screen.

Microsoft Teams Integration

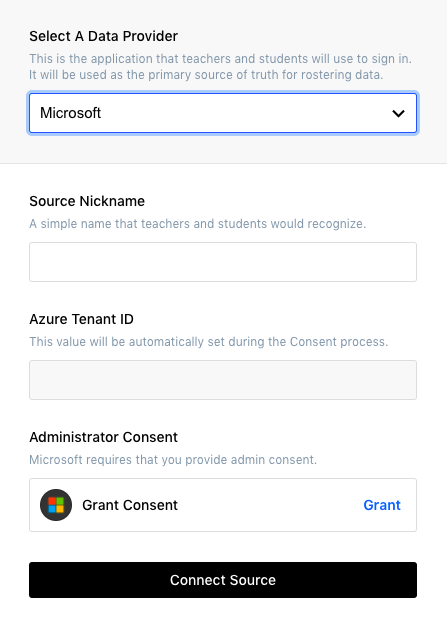
When you get to the Sources page, select "Microsoft" from the dropdown. You will see the following form:

Connect Microsoft to Edlink

  1. Source Nickname - Create a nickname that your students and teachers will recognize. This name can be something like "Microsoft Office 365" or "My School's Microsoft Teams". It does not have to be anything in particular, but it should be familiar to your users.
  2. Azure Tenant ID This property will be set automatically during the next step. It represents the Microsoft ID for your school or university.
  3. Administrator Account - This is the final step and ensures that you have completed everything else successfully.
    1. Click the Connect button on the right side of the box.
    2. Log into your Microsoft Office 365 account. You may already be logged in, in which case, skip to the next step.
    3. Microsoft will prompt you to authorize Edlink. Click the authorize button if you are prompted.
    4. Upon authorization, Microsoft will send you back to Edlink and the box will change to say "Account Connected". You will also notice that the Azure Tenant ID has been filled in for you.

You are now finished and can click the black "Connect Source" button at the bottom of the screen.